Unturned II Dev Kit
The Unturned II Dev Kit was a modified version of the Unreal Engine 4 development kit, and would have been the core modding tool for Unturned II. It would have been made publicly available to users after the game's official release.
Although the Dev Kit was never released, early documentation for it was included on the game's wiki. This documentation would have served as a reference for both modders as well as Smartly Dressed Games, and would have been officially maintained. Since the Dev Kit is unavailable to modders due to the game's development being indefinitely paused, this information is only preserved for historical purposes. More extensive documentation for existant features was planned, such as creating custom cars and access to the Hatchback mesh, but this was never released.
Getting started
It was recommended that modders download Unreal Engine 4 and Autodesk Maya. To streamline the modeling and animation experience, there was also a "U4-Maya" plugin available from Smartly Dressed Games' GitHub page. Alternatively, Blender could be used as a free alternative to Maya. Particle effects could be created with the Unreal Engine's Niagara VFX System.
All mods would have a top-level folder for their content. For vanilla Unturned II content, this folder was named "UE4".
Standards and conventions
To keep projects consistent between Unreal Engine 4 and Unturned II, code should adhere to the standards and conventions used by Epic Games. In addition to Epic Games' coding standards, there were some additional styles that should have been followed.
- Classes should first be organized by visibility: (1) public, (2) protected, (3) private. Within each category, members should be sorted by: (1) constructors, (2) properties, (3) operators, (4) functions, (5) interfaces.
- Delegate names should be past tense, and suffixed with "Signature". For example,
FItemAddedSignature. - Event dispatchers should be prefixed with "On", and any functions bound to them prefixed with "Handle". For example,
HandleItemAddedwould be bound toOnItemAdded. - Inputs should be prefixed with "In" and outputs with "Out". An exception is made for setter functions, which should be prefixed with "New" instead.
For example:
bool DoSomething(UPARAM(Ref) const FInputData& InData, FOutputData& OutData);

UStaticMesh* Mesh;
void SetMesh(UStaticMesh* NewMesh);
Documentation
To support Doxygen – a documentation generator – specially-formatted comments should be included with the code.
/**
 * Explain what the method does.
 * @param NumAttempts - Explain this parameter.
 * @return Was the attempt successful? Explain the returned value.
 */
UFUNCTION(BlueprintCallable)
bool TryToDoSomething(int32 NumAttempts);
Naming conventions
To make identifying assets outside of the Unreal Engine quicker, assets should be prefixed with a short acronym for their type. Depending on the type, it may also be suffixed.
| Type | Prefix | Suffix |
|---|---|---|
| Animation | A_ | |
| Animation Blueprint | ABP_ | |
| Animation Montage | AM_ | |
| Aim Offset | AO_ | |
| Blueprint | BP_ | |
| Data Asset | ClassName(DataAsset)_ | |
| Material | M_ | See "Materials" table |
| Material Instance | MI_ | See "Materials" table |
| Physics Asset | PHYS_ | |
| Physical Material | PM_ | |
| Skeletal Mesh | SK_ | |
| Sound Attenuation | ATT_ | |
| Sound Cue | SQ_ | |
| Sound Wave | SW_ | |
| Static Mesh | SM_ | |
| Texture | T_ | See "Textures" table |
| Widget Blueprint | WBP_ |
| Use | Suffix |
|---|---|
| Surface | |
| Decal | _D |
| Particle System | _PS |
| Post Process | _PP |
| User Interface | _UI |
| Use | Suffix |
|---|---|
| Base Color | _BC |
| Normal Map | _N |
Additionally, asset source files (such as .psd or .blend) should be suffixed with _Src (e.g., SM_Prop_House_1stry_01_Src.blend). Mesh LODs are suffixed with _LOD# (e.g., SM_Prop_House_1stry_01_LOD0.fbx).
Denizens
In the code, humans survivors are called "Denizens" in order to distinguish them from other types of characters or players. If the Dev Kit had released, documentation for denizens would have included downloads for the animation rig (including additional setup, such as handling materials), a script to streamline importing assets from Blender into Unreal Engine 4, and steps for importing custom animations or meshes.
Denizens underwent multiple iterations during the private beta, each making significant changes to their proportions. All of these proportions are documented below, including the proportions of Unturned player characters for reference.
| Type | 3rd iteration | 2nd iteration | 1st iteration | Unturned |
|---|---|---|---|---|
| Leg length | 75 cm | 85 cm | 74 cm | 75 cm |
| Arm length | 75 cm | 85 cm | 60 cm | 75 cm |
| Head size | 35 cm | 30 cm | 38 cm | 40 cm |
| Limb size | 30 cm | 20 cm | 23 cm | 38 cm |
| Subdiv (mesh density) |
15 cm (upper) 10 cm (lower) |
10 cm | 14 cm | 19 cm |
Inventory
The "Inventory" consists of anything to do with items – from their use, to their storage.
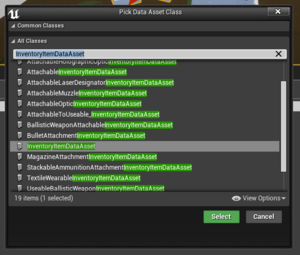
Information about items and their stats are stored in UInventoryItemDataAssets. To create a custom item based on an existing item type, you would create an instance of an item data asset in the content browser. The class you pick is based on the type of item you want to create. For example, to create a backpack you would use UWearableInventoryItemDataAsset. If you cannot find the class you are looking for, you can open an existing item data asset similar to the one you want, and view its type.
When the item you want to create is wildly different from anything already in Unturned II, you could create a subclass of UInventoryItemDataAsset, or the most similar existing item class. From there, you could add extra information and behavior to your item, and override item data functions.
Custom item overlays
Modders would also be able to create custom item overlays, context menus, or inspectors. Several of the inventory item widgets were designed to be extendable and customizable.
All custom menu buildables shared a function you should override called ShouldIncludeForItem. This function determines whether your menu content was eligible for building details, actions, etc. for an item instance. When your menu buildable's Create and CreateWidget functions are called, they receive an InBuilder parameter. This is used to register built menu contents. For example, an action builder has BuildAction and BuildActionWidget functions – allowing you to build as many or as few as you need.
At-a-glance synopses
At-a-glance overlays (or "synopses") are shown on top of item icons to quickly convey critical information. The charge remaining in a battery, the bullets left in a stack, and the amount of ammunition loaded into a firearm are all examples of critical information that could be conveyed with an at-a-glance overlay. Modders would be able to create their own by subclassing UInventoryItemAtAGlanceMenu_SynopsisBase, and the widget subclasses of UInventoryItemAtAGlanceMenu_SynopsisWidgetBase. For advanced uses, specifying a custom UInventoryItemAtAGlanceMenu_Builder in your UInventoryItemDataAsset was also an option.
Context actions
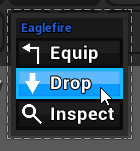
Context-based action buttons are available when clicking on most items, and can also be auto-performed (such as dropping an item when using a specific key combination). Equipping, dropping, and inspecting an item are all examples of context actions. Modders could create their own by subclassing UInventoryItemContextMenu_ActionBase. Most of the vanilla actions used ActionBase's helper function "CreateDefaultActionWidget", which created a button with an icon and label. For advanced cases, modders modders could specify a custom UInventoryItemContextMenu_Builder in their UInventoryItemDataAsset.
By overriding CanPerform, actions can be shown as a hint of what can be done with the item, but cannot currently be performed. An action's Perform method is called when auto-performed or clicked in the menu. To opt in, override CanAutoPerform and use a low sort order to get selected. Sort order is used to rank each action's priority. The highest priority action (the action with the lowest number) is auto-performed in some cases. By using custom sort orders, modders could insert their actions between others.
| Sort order | Description |
|---|---|
| 1000 | Equip |
| 1001 | Dequip |
| 5000 | Pickup |
| 5001 | Drop |
| 10000 | Default |
Inspector details
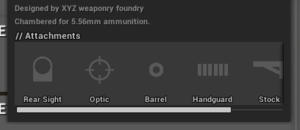
Inspector details are used when inspecting the 3D preview of an item. They provided extended information about the item, like stats or lore, and could include extra options such as toggles for zipping or unzipping a coat. Custom inspector details could be created by subclassing UInventoryItemInspectorMenu_DetailsBase. For simple text details, using DetailsBase's helper function CreateTextDetailsWidget to add a line of text (e.g., for an item's description) would be sufficient. For more advanced cases, specifying a custom UInventoryItemInspectorMenu_Builder in the item's UInventoryItemDataAsset would be sufficient instead.
Similar to context actions, inspector details had a sort order that determines where they appear.
| Sort order | Description |
|---|---|
| 1000 | Description |
| 5000 | Text |
| 10000 | Attachments |
| 15000 | Default |
| 20000 | Stats |
Interaction
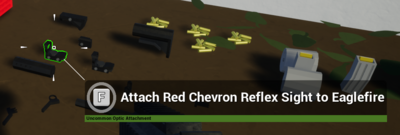
Interactions could be executed on Interactable objects in the world via Interactors. For example, a custom interaction called "InteractableMenu_AttachToUseableInteraction" was created to allow for quickly attaching items to the player's equipped useable, from the ground. Although the Dev Kit was never released, documentation would have covered custom interactions, custom Interactable objects, and the benefit of custom Interactors.
Wearables
Clothing (also known as "wearables") could be equipped to WearableSlotDataAsset. All of the vanilla slots could be found along the /Unturned/Data_Assets/Wearable_Slots file path. Documentation for clothing would have covered how to import .blend files, appending and linking groups, transferring data modifiers, and an export script.
Props
Props are actors used to build the level's environment in Unturned II. In Unturned, these were called "objects". To maintain a cohesive art style, it was recommended to keep dimensions consistent between similar types of props. For example, all of the vanilla buildings followed the same dimensions.
| Type | Specs |
|---|---|
| Room height | 3 m |
| Foundation depth | 1 m below the lowest doorway |
| Wall width | 25 cm |
| Doorway (normal) | 1.75 m × 2.25 m |
Most props should only need two LODs. Building LODs were being created manually. For anything, using Unreal Engine's automatic LOD generation would be suitable if the results were good enough.
Unturned II would not have had any visually openable containers except for a few static props, although destructible props were planned.
Eavestroughs
Some buildings, such as houses, have eavestroughs. Thematically, these are metal pipes positioned around slanted rooftops intended to collect rainwater and route them away from the building. They are part of a building's higher detail meshes.
A good workflow for creating them is to first block out the layout for the eavestroughs in a new layer, without insetting anything. In official props, this is called Eavestrough_Base_Src. Once a design is complete, the base can be copied, and the tops and bottoms of the pipes can be inset. Finally, another copy can be created, with all of the insignificant faces removed for LOD1.
| Type | Specs |
|---|---|
| Trough top | 2.5 cm lower than the roof |
| Trough top width | 25 cm |
| Trough bottom width | 20 cm |
| Trough inset | 5 cm inward and 20 cm downward |
| Trough extension past wall | 5 cm |
| Pipe length | Top of curve 60 cm above ground |
| Pipe curve | Down 25 cm and outward 25 cm, rotated 90 degrees |
| Pipe inset | 5 cm inward |
| Pipe brackets | 10 cm from top and bottom |
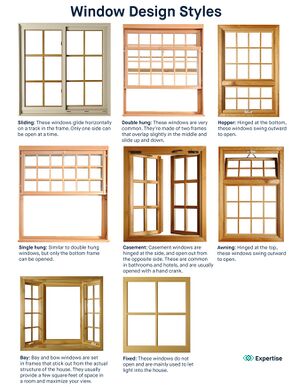
Windows
In Unturned, inconsistent window sizing meant that buildable barricades such as glass or window fortifications were unable to properly cover them. While these buildables had not been implemented into Unturned II during its active development, buildings were designed with standardized window sizes in mind. Breakable glass and frame props would be designed to fit those window sizes.
Normal windows were 100 cm, 150 cm, 200 cm, 250 cm, 300 cm, 350 cm, or 400 cm by 150 cm. Upper windows were 100 cm, 150 cm, or 200 cm by 50 cm. Additionally, lower lip trim would extend 5 cm above and below, and 10 cm out to the sides. While edge trim extended 5 cm above and below, and 5 cm out to the sides.
Sockets
Sockets are used in prop meshes to make composite props easier to create, such as attaching doors to door frames. Sockets can be imported from modeling applications by prefixing their name with "SOCKET_" in all caps.
Door sockets are placed at ground level in the center of doorways, and are oriented with the 𝘟-axis pointing outward from the room, and the 𝘡-axis pointing upward. They should be named SOCKET_Door_(Dimensions)_(##). For example the front door to a house might be: SOCKET_Door_175x225_03.
Window sockets are placed in the center of windows, and are oriented with the 𝘟-axis pointing outward from the room, and the 𝘡-axis pointing upward. They should be named SOCKET_Window_(Dimensions)_(##). For example a 200 cm by 150 cm window might have a socket named: SOCKET_Window_200x150_49.
Rail systems
Unturned II would have supported multiple rail systems for mounting attachments to firearms. Although support was planned for Picatinny rails, dovetail rails, Warsaw Pact rails, Weaver rails, KeyMod, and M-LOK, only Picatinny rails had been documented during the development of Unturned II.
Picatinny rails were 6 cm wide, with 2 cm between notches of 5 mm in height. A socket was located in the center of each notch. Picatinny brackets were 5 mm thick above notches (or 1 cm below), and 5 mm outward on all sides.
Additional notes
- All static meshes should be inside blueprints, even when they do not require additional data.
- Normal maps were not being used at the time Unturned II was still in active development.
- Animating meshes inside of the Unreal Engine was acceptable.
- Roads and tunnels are built using splines. Static meshes are used for road intersections.
